
A strong keyboarding skill is arguably the best technical skill you can acquire in today’s digital era. Yet so many individuals fail to master this important skill because they never learn to properly touch type. To establish keyboard mastery, it’s important to equip yourself with the right tools for a successful outcome. You really only need three things:
1. Keyboards/Covers
A specialized keyboard or typing cover that will prevent you from looking at your fingers while typing.
2. Lots of Practice
Like any skill, keyboard mastery cannot be acquired without lots of time and practice so be sure to commit to daily practice and letter by letter you’ll achieve true touch type mastery.
3. Keyboarding Software
We strongly recommend using keyboarding software where correct fingering, technique, and exercises are provided with opportunities for repetition so that muscle memory can be developed.
Top Keyboards and Covers for Learning to Type
Here are the top 5 recommendations for keyboards and covers for learning how to touch type:
#1 - Learning Lights Keyboard
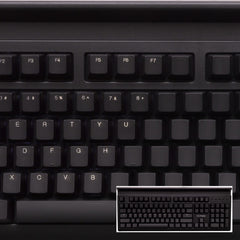
An easy winner here is the KeyMaster Mechanical Learning Lights Keyboard. Designed by keyboarding teachers but with the quality of a gaming keyboard, this keyboard takes the work out of hiding key lettering. Each key can be turned on or off with the press of a button to view or hide key visibility. For example, if you wanted to practice touch typing on the home row, you could press the SET key + desired keys to turn off the backlighting, effectively making each key appear to be blank. Problem solved! If you can’t see the key characters, the temptation to look at your fingers while typing is eliminated.
Pros: An all-in-one solution for hiding key visibility. Provides seamless transition from touch type practice keyboard to traditional keyboard for regular use. Mechanical quality offers additional uses aside from keyboarding education.
Cons: More expensive than keyboard covers. Device stand for iPads, phones, etc. on top of keyboard may not be desirable for all users.
#2 - No Peek Keyboard Cover
By: B.E. Publishing
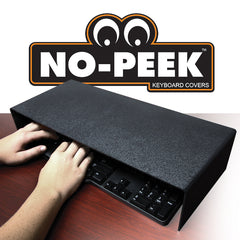
This keyboard cover is very useful for preventing students from looking at their fingers while typing. Typists can place this cover over the keyboard and place their hands underneath, effectively preventing the typist from looking at their fingers during keyboarding practice. Unfortunately, this too isn’t foolproof as students can adjust the cover so fingers can still be peeked at with some effort. Another big downside to the No Peek Keyboard Cover is that while they can discourage a student’s ability to look at their fingers, they also hide the teacher’s ability to check for proper finger use and keyboarding technique. With the keyboard cover in place learners could be using improper fingering that teachers cannot see or know to correct.
Pros: Effectively hides visibility of fingers during touch type practice. Durable, long lasting design.
Cons: Large, bulky metal frame is difficult to tuck away during other activities. Technique is not visible by the instructor. Some students will still choose to “peek” under their keyboard covers.
#3 - Speedskin Orange Keyboard cover
By: Speedskin

This Speedskin keyboard cover has been around for a long time and is a popular way to hide key lettering on the keyboard. It is small, lightweight, and can easily be stored away when not in use. The downside is these key covers don’t always fit right and change the feel of the keyboard. Our experience in the classroom tells us that most keyboarding teachers and students don’t like the feel of the keys when the cover is on.
Pros: Lightweight and easy to store. Inexpensive.
Cons: Cover may not fit well on certain keyboards. Covers pop off too easily or become damaged and rip. Change in feel of keys makes touch typing more difficult. Product seems old fashioned and out of date.
#4 - Kinder Board Color Coded Keyboard
By: Ablenet 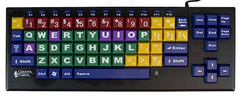
While we like some aspects of this color coded keyboard, we can’t get past the fact that it encourages the typist to look at their fingers instead of discouraging this practice. Ablenet’s Kinder Board shows what fingering to use by color coding keys to specific fingers. Unfortunately, students who look at their fingers while typing won’t get very far in becoming a fast typist. We appreciate the effort given here towards encouraging proper fingering but this keyboard falls short of being an effective tool for learning to key by touch.
Pros: Can be effective for early ages (5-7) who are still learning to find the keys on the keyboard.
Cons: Encourages students to look at fingers while typing. Colorful keys are not highly desirable for everyday use or for older typists.
#5 - All blank keyboard
By: Das Keyboards

All blank keyboards are certainly an effective way to discourage looking at the keyboard while typing, but it is not a widely used method for touch type mastery for several reasons. Most blank keyboards are actually mechanical keyboards designed for high level gaming or programming, not necessarily as an educational tool for mastering the keyboard. Because of this, many of these keyboards such as the Das Keyboard 4 Ultimate have a very high price tag ($169) that puts them out of the running for a children’s learning keyboard. Additionally, the practicality of an all blank keyboard doesn’t really make sense in an educational setting. Teachers who have chosen this route typically keep two keyboards in their classroom, one all blank keyboard and a second traditional keyboard and must transition back and forth between keyboards to fit the needs of the activity. We strongly encourage anyone considering an all blank keyboard for keyboarding instruction to check out the Learning Lights Keyboard as discussed above in item #1.
Pros: High performance keyboard with all blank keys.
Cons: Not designed for educational use. Expensive and not practical in a classroom setting where key visibility is needed for certain activities.
Keyboarding Software Recommendations
As far as keyboarding software goes: here is a short list of recommended keyboarding software programs. All are very similar and will get you where you need to go.
Practicing Tips
Just like any skill, regular typing practice is essential to successful keyboard mastery. Choose a typing program you like (see software recommendations above) and set aside at least 10 minutes a day to complete daily lessons. Most typing lessons are designed to be fairly short so shoot to complete at least one lesson per day. Be conscious of your keyboarding technique throughout the day and be careful not to look at your fingers during day to day activities, especially for keys that you have already practiced in your daily lessons. Be sure you have a proven method for hiding key fingering during typing practice. See the Keyboards and Covers for Learning to Type section above for products that can help you with this. Key by key, day by day with consistent practice you will discover that your keyboarding skill will increase dramatically and you will enjoy the benefits of a strong keyboarding skill, both by increasing your cognitive power while typing and by increasing efficiency in your daily computer activities.